How Smart Telescopes Work: Plate Solving, Live Stacking and the Numbers That Matter
Our top picks
 The reference design: 50 mm f/5.2, built-in dual-band filter, EQ mode, about $999ZWO Seestar S50 Pro Smart Telescope50 mm f/5.2 · 2.45° × 1.38° · 6.2 lb8.6Price tier: Mid-rangeCheck price on Amazon
 Fastest small optics: 35 mm f/4.3 with a 4K Starvis 2 sensor, about $549DWARFLAB Dwarf 3 Smart Telescope35 mm f/4.3 · 2.93° × 1.65° · 3 lb8.2Price tier: BudgetCheck price
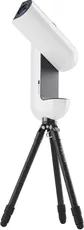 Finest 50 mm sampling: 1.7″ per pixel and automatic master darks, about $2,990Vaonis Vespera Pro 2 Smart Telescope50 mm f/4.9 · 1.6° × 1.6° · 11 lb8.1Price tier: PremiumCheck price
A smart telescope looks like a sealed box, but inside it’s doing the same things an experienced astrophotographer does with a mount, a camera and a laptop. It just does them automatically, in a few minutes, and hands you a finished picture on your phone. Once you know what’s happening at each step, the spec sheets make a lot more sense, and so do the differences between a $474 Seestar and a $4,299 Celestron Origin.
This explainer covers the imaging loop first (plate solving, GoTo, tracking, short exposures, live stacking, calibration, filters and stretching), then the optical numbers that decide what each scope can do, with worked examples from the models we track. We haven’t tested these telescopes ourselves; specs are the makers’ and test findings are credited to the outlet that ran them.
The camera takes a short frame, matches the star pattern to a catalog and works out exactly where it's pointing. No star alignment, no finder scope.
Motors slew to your target and follow it as the Earth turns. Alt-az mounts also rotate the image slowly, which the software corrects.
Instead of one long exposure, the scope takes many 10–30 s frames. Frames spoiled by clouds, wind or bumps are rejected.
Each new frame is aligned and averaged into the running image, so noise drops and faint detail appears as you watch: roughly √N better signal-to-noise after N frames.
The app stretches the faint data, removes gradients and denoises, then saves a JPEG (and often FITS/TIFF) to your phone.
See it applied to your sky in the stacking time estimator.
Step 1: Plate solving
Traditional GoTo telescopes need a star alignment: you center two or three known stars and the mount builds a model of the sky. Smart telescopes skip that. The main camera takes a short frame, and the software compares the pattern of stars with a catalog to work out exactly where the telescope is pointing and how the frame is rotated. That’s plate solving, and it takes seconds.
Plate solving is also how the scope re-centers after a slew and how it knows to build a mosaic in the right places. Celestron’s phone-guided StarSense telescopes use the same idea through your phone’s camera, but you push the tube yourself; see smart vs traditional telescopes.
Step 2: GoTo, tracking and field rotation
Once the scope knows where it’s pointing, motors slew it to your target and keep following it as the Earth turns. Nearly all smart telescopes use an alt-az mount, which moves up-down and left-right. The sky, though, turns around the celestial pole. An alt-az mount can keep a target centered, but over time the frame slowly rotates around it. This is field rotation.
Smart telescopes handle it in software: each frame is rotated back into line before stacking, and the edges get cropped. Rotation also limits how long a single exposure can be before stars at the edges smear. That’s why some makers offer an EQ mode: tilt the scope to your latitude so one axis lines up with the celestial pole, and rotation goes away. ZWO says the Seestar S50 Pro allows 60-second exposures in EQ mode with its TH10 head; DWARFLAB claims 60 s for the Dwarf 3 and 90 s for the Dwarf Mini. Vaonis and Unistellar scopes are alt-az only. Our EQ mode guide explains the setup.
Step 3: Short exposures
Instead of one long exposure, the scope takes many short ones, often 10–30 seconds each. Short subs keep each frame sharp despite rotation and small tracking errors. They also mean a gust of wind, a passing car’s headlights or a satellite trail spoils one frame, not the whole night, and the software simply rejects that frame.
Step 4: Live stacking
This is the heart of a smart telescope. Each new frame is aligned to the stack (by matching stars) and averaged into a running image. Random noise partly cancels out as frames add up, while the real signal from the target builds. As AstroBackyard’s guide to live stacking explains, the noise falls in real time as you watch, which is what makes it feel like observing rather than waiting. Signal-to-noise improves roughly with the square root of the number of frames, so 100 frames are about 10× cleaner than one, and 400 frames only twice as clean as 100. That diminishing return is why faint targets need hours, not minutes.
To estimate how long a target needs on your scope and sky, use the stacking time estimator.
Step 5: Dark frames and calibration
Camera sensors add their own noise and a sprinkling of “hot” pixels that glow even in total darkness, especially when warm. A dark frame is an exposure with no light reaching the sensor. Subtract it from your light frames and much of that pattern disappears.
Makers handle this differently. ZWO lists a dark filter on every current Seestar, an opaque position that lets the camera record darks. Vaonis says the Vespera Pro 2 takes automatic master darks, while Zelpio found the Vespera 3 doesn’t, so hot pixels can show as green rows in its stacks. Stacking with slight shifts between frames (dithering) also helps hide hot pixels, and Celestron added dithering to the Origin in a 2026 app update.
Step 6: Filters
A UV/IR-cut filter keeps stars sharp by blocking light the optics don’t focus well. A dual-band filter passes only two narrow slices of the spectrum: H-alpha and OIII, the light that emission nebulae give off. The Seestar S50 Pro’s passbands are 20 nm (H-alpha) and 30 nm (OIII), per ZWO; a dedicated filter such as the Optolong L-eXtreme narrows them to 7 nm each, according to First Light Optics’ listing. Everything in between, including most streetlight glow, is blocked.
Default on every smart scope: sharp stars, natural color. Use for galaxies, clusters and the Moon.
Passes only the two colors emission nebulae glow in and blocks most light pollution, including LEDs. Big gains on nebulae; useless for galaxies and clusters.
Cuts sodium and mercury streetlight lines while keeping star color. Modest help under old-style lighting, little under white LEDs.
Blocks 99.999%+ of sunlight at the front of the scope for sunspots. Must be a certified full-aperture filter, never at the eyepiece end.
Which to buy for your scope: best filters for smart telescopes.
The catch: galaxies, star clusters and reflection nebulae shine across the whole spectrum, so a dual-band filter dims them along with the sky. Use it for nebulae like the Orion and Rosette, and take it out for Andromeda. Our filter guide and city skies guide go further.
Step 7: Stretching and processing
Raw stacked data looks almost black, because faint nebulae sit just above the background. Stretching brightens the faint tones far more than the bright ones, so the nebula appears without blowing out the stars. Apps also remove gradients (the uneven glow from light pollution or the Moon), reduce noise and balance color, then save a JPEG. Many also save FITS or TIFF files for editing on a computer; Vaonis lists BalENS gradient removal on the Vespera Pro 2.
The optical numbers that matter
Three numbers set what any telescope can do.
Aperture is the diameter of the main lens or mirror. Light grasp scales with its square, so a 50 mm lens collects about 2.8× the light of a 30 mm one, and the Origin’s 152 mm mirror about 9× that of 50 mm.
Aperture sets how faint and how sharp you can go; focal ratio sets how fast an image builds. See how smart telescopes work.
Focal length sets image scale: longer focal lengths magnify more and frame less sky.
Focal ratio is focal length ÷ aperture. It sets how bright each patch of the image is on the sensor, and so how fast an image builds. The S50 Pro is 260 ÷ 50 = f/5.2; the Dwarf 3 is 150 ÷ 35 = f/4.3; the Celestron Origin is 335 ÷ 152 = f/2.2. Going from f/5.2 to f/2.2 makes each patch of sky about 5.6× brighter on the sensor.
Pixel scale: the formula and worked numbers
Pixel scale tells you how much sky each pixel covers:
Pixel scale (arcseconds per pixel) = 206.265 × pixel size (µm) ÷ focal length (mm)
| Scope | Pixel | Focal length | Pixel scale | Jupiter (~45″) |
|---|---|---|---|---|
| Seestar S30 Pro | 2.9 µm | 160 mm | 3.74″ | ~12 px |
| Dwarf 3 | 2.0 µm | 150 mm | 2.75″ | ~16 px |
| Seestar S50 Pro | 2.9 µm | 260 mm | 2.30″ | ~20 px |
| Vespera Pro 2 | 2.0 µm | 245 mm | 1.68″ | ~27 px |
| eQuinox 2 | 2.9 µm | 450 mm | 1.33″ | ~34 px |
| Origin Mark II | 2.0 µm | 335 mm | 1.23″ | ~37 px |
| Odyssey | 1.45 µm | 320 mm | 0.93″ | ~48 px |
Worked example for the S50 Pro: 206.265 × 2.9 ÷ 260 = 2.30″ per pixel. Smaller numbers mean finer sampling and more pixels across small targets, which is why the Vespera Pro 2 and Unistellar scopes suit small galaxies. DWARFLAB notes the Dwarf 3’s pixels can be binned 2 × 2 (4 µm) for astro work at 1080p output, which doubles its effective scale.
Field of view: the formula
Field of view (degrees) = sensor dimension (mm) ÷ focal length (mm) × 57.3, where sensor dimension = pixel count × pixel size.
- Seestar S50 Pro: 3840 × 2.9 µm = 11.1 mm wide and 2160 × 2.9 µm = 6.3 mm tall. 11.1 ÷ 260 × 57.3 ≈ 2.45°, and 6.3 ÷ 260 × 57.3 ≈ 1.38°.
- Dwarf 3: 3840 × 2.0 µm = 7.7 mm; 7.7 ÷ 150 × 57.3 ≈ 2.93° wide.
- Vespera Pro 2: 3536 × 2.0 µm = 7.1 mm square; 7.1 ÷ 245 × 57.3 ≈ 1.65° (Vaonis quotes 1.6°).
That’s why the Andromeda Galaxy, about 3° long, fits in one S30 Pro frame but needs two panels on the S50 Pro. Try any target and scope in the framing calculator.
Three designs, three trade-offs
- Seestar S50 Pro is the balanced reference: 50 mm at f/5.2, 2.30″ pixels, a 2.45° field, built-in dual-band and dark filters, EQ mode. About $999. Check the S50 Pro price.
- Dwarf 3 trades aperture for speed and portability: f/4.3 optics, a 4K Starvis 2 sensor and a 2.93° field in 1.35 kg. About $549. Check the Dwarf 3 price.
- Vespera Pro 2 trades field for detail: 1.68″ pixels, automatic darks and a 1.6° square field. About $2,990. Check the Vespera Pro 2 price.
How we sourced this
Specs (aperture, focal length, pixel size, pixel count, filters, exposure limits) are the makers’ own figures from models we track; we compute pixel scale and field from them and note where makers quote something different. Test findings come from the outlets named. Our tools use the same formulas, stated on each tool page, and our method is on how we research.
Frequently asked questions
How does a smart telescope know where to point?
What is live stacking?
Why do smart telescopes use short exposures?
What does the focal ratio of a telescope mean?
How do I calculate a telescope's field of view?
Sources
- AstroBackyard: Live stacking and EAA · checked 2026-11-12 — Live stacking combines many short exposures in real time, reducing noise as the image builds; it is the basis of electronically assisted astronomy (EAA).
- First Light Optics: Optolong L-eXtreme dual-band filter · checked 2026-11-12 — Two 7 nm passbands at H-alpha and OIII with no transmission between H-beta and OIII; not for solar use.
- Vaonis: Vespera new generation (Vespera 3 and Vespera Pro 2) · checked 2026-11-12 — Vaonis lists automatic master darks and BalENS gradient removal on the Vespera Pro 2, with about 1.7″ per pixel.
- Zelpio: Vaonis Vespera 3 review · checked 2026-11-12 — The Vespera 3 takes no automatic dark frames, so hot pixels can show as green rows; real-world battery was about 12 h.
- ZWO: Seestar S50 Pro product page · checked 2026-11-12 — 50 mm f/5.2 with 2.9 µm pixels, dual-band (OIII 30 nm / H-alpha 20 nm) and dark filters, and 60-second exposures in EQ mode.
- DWARFLAB: Dwarf 3 smart telescope · checked 2026-11-12 — 35 mm aperture, 150 mm focal length, Sony IMX678 with 2 µm pixels and a dual narrowband filter.
Get new guides by e-mail
One short e-mail when Smart Telescope Review publishes a new guide. No spam, no sharing your address, and you can unsubscribe in one click.